Finder

Keyboard shortcuts for OS X

osx_keyboard_shortcut.jpg

Learn these basic shortcuts to increase your productivity

We have published this set of useful keyboard shortcuts on our 'Apple in the Classroom' section so you can download them and print them off. Although this is not a fully comprehensive list of the OS X shortcuts we feel that Teachers especially would be able to benefit, mainly because they will save you time, lots of time!

So please refer to the list and if you feel that we have missed anything important let us know in the comments section.

⌘ command key - Your are commanding your computer to perform an action.

⌥ option key - You will be presented with options/alternatives.

⌃ control key - A modifier key. Can be used in combination with the above keys.

⇧ shift key - Rarely for shortcut modification, but those that do are worth remembering.


View/Change Application

  • Keep the command key held down while pressing tab.

This allows you to view all of your open applications. You can bring one application to the top of your layer (making it the active application).

Find a file or application quickly

  • command + spacebar.

You will notice the spotlight search open in the top right of your screen. Now type ‘itu’ and hit return. You just launched the iTunes application. Also a great way to find files, email etc.

Finished with an application? Close it!

  • command + Q - Think, I am ‘commanding the computer to Quit’.

Other important commands are:

  • command + S - Save.
  • command + N - New (new email, new document, new Finder window, depending which application you have active).
  • command + P - Print.
  • command + A - Select all (text, images, files etc)
  • command + C - Copy.
  • command + X - Cut selected text to primary clipboard.
  • command + V - Paste clipboard contents.
  • command + Z - Undo.
  • command + H - Hide active application.

Finder specific:

  • command + delete - Delete selected file/folder.
  • command + i - Information, such as file size about selected file/folder.
  • command + option + i - using the option key here is a variation of the above command. Now the information window dynamically changes to reflect the currently selected file.

Screenshots:

  • Command + Shift + 3 - Takes a fullscreen screenshot and saves it to your Desktop
  • Command + Shift + 4 - Takes a screenshot of a screen area and saves it to your Desktop
  • Command + Shift + 4 + Space bar + click on window - Takes a screenshot of a certain window.

My personal favourites:

  • command + control + D - Mouse over any word and this key combination will reveal the dictionary definition and thesaurus option.
  • command + T - New tab in a internet browser window.
  • command + K - Cuts to secondary clipboard.
  • command + Y - Pastes secondary clipboard contents.
  • spacebar - Press when any file in selected to preview that picture, document, even movies.
  • option + shift + command + V - Seriously, try this one once and you’ll never stop using it. It will paste text into a document and copy the Paragraph Styles of the document. This one will save you the most time.
  • When viewing menus, such as the  menu hold down the option key - notice that About This Mac changes to System Profiler. This expansion of menu options is common with the option key.

This list may seem like a lot to remember but I can’t recommend enough that you try a few of these. Print out this document, keep it near by and I guarantee that you will save minutes everyday. Those minutes add up and you will be far more productive.

If you have any of your own favorites that are not on this list please contact us at iSupport and we’ll happily add them.


Apple support for teachers

Apple_in_the_classroom.png

At iSupport we have made it easy for teachers who find themselves in an Apple 1:1 environment. If you require a basic introduction to the Apple iLife or iWork suite then head over to our new Apple in the Classroom page. We have created a selection of PDF documents which you can download and use in class. New and old teachers will find our free resources very useful.

Please visit: http://isupport.com.au/apple-in-the-classroom/

We have been contacted by a few people and some requests have been put in for a demo of 'Green Screen in iMovie' and also using a 'wiki or  blog in the classroom'. We will have these documents prepared in the coming weeks - we promise! But please keep the request & comments coming in.

Also we are preparing video guides on the use of the iPad in a learning environment - due out this week. We look forward to seeing you on the site soon!

New Mac or new image? 10 things to consider doing.

Mac_Box.png

This article is perfect if you have just bought a Mac & you're unsure what to do with your new machine. Network administrators who have to create an 'image' for their company or school will also find this interesting. When you create an image which will be duplicated across 100's of machines in your organisation you need to be sure that you provide a flexible set-up that caters for every possible outcome. All of these points below should be considered when creating a clean start or image.

  1. Run System update from the Apple menu.

  2. Always set the clock so that the dividers : between the numbers flash.

    This quick trick is an easy way to see if the system has encountered an irrecoverable crash. If you're having issues & those dividers are not flashing you will have to hold down the start button until the machine shuts down. You may also wish to display the date.

  3. Remove around 3 gigs of unneeded language files fom your system.

    Monolingual is a great 3rd party tool to do this for if you are not confident doing it manually. I highly recommend monolingual, it is a free download so please check it out.

  4. Screen real estate is vital.

    Ensure that 'automatically hide and show the dock' is selected in the Dock preferences. Keeping the dock out of sight will allow 13" macbook screens to use their full 800 pixel depth all the time.

  5. Enable right click for the mouse.

    There is nothing more annoying then plugging in a mouse only to find that the 'right click' doesn't work.  It is listed as secondary click in the Mouse Preferences.

  6. Do not enable either Spaces or Expose.

    This will only lead to confusion for the user, especially if they are a beginner. Once the user becomes familiar with 'active screen corners' and why expose or Spaces will be beneficial for them allow them to enable these features.

  7. Disable Automatic Login.

    You will find this in the Accounts/Login Options, this is vital for security.

  8. Network Locations!

    Assuming that your organisation runs behind certain proxies you will need to enter those network settings to allow access. Or indeed for home users you may find yourself regularly visiting a location where you are always entering an 802.1x authentication which just don't need when accessing you home network. Create 2 different locations in the network settings menu. You can quickly swap the location from the Apple menu.

  9. Install Firefox.

    Between Fifox & Safari you should be able to render any part of the Internet correctly. Surprisingly the are many tasks which only Fifefox can perform properly online. You'll know when you'll need it.

  10. Downlaod & install Flip for Mac.

    This will allow you to run most .wma & .wmv (normally reserved for Microsoft platforms) files.  You may also want to consider installing VLC player. This way any video formats that QuickTime cannot play should be covered by VLC.

  11. Set your system Language to British or Austaralian English if needed! Check this tutorial for more on the that
  12. Click on the Finder menu & choose Preferences.

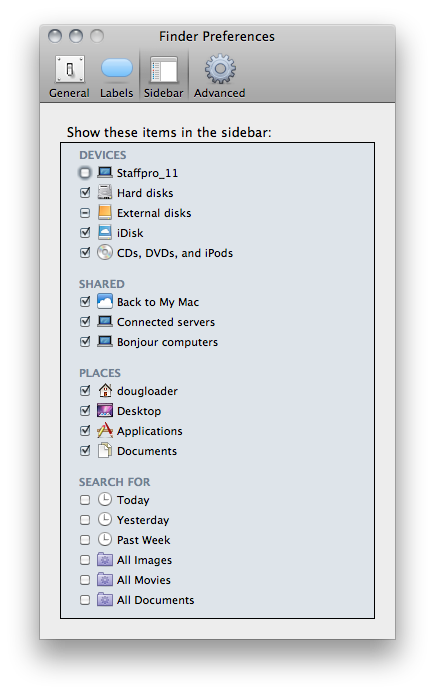
    Click the Sidebar menu. If you are just not going to be using the Mobile Me service uncheck the iDisk device.You may wish to further customise the Finder window from here.  For more on the Finder check out this article.

  13. Ensure that PDF documents are opening with Adobe Acrobat Pro (if you have it installed)

    Select a PDF document and press command I. In the information window that opens see that 'Open with' has Adobe Acrobat Pro selected. Then click 'Change all'.

Ok so I listed 13 things not 10! But please do have a look into each one of these points after you purchase a new Mac. And definitely consider all of them before rolling out a new disk image for your organisation. Have I missed anything? Please add your tips below...

The Finder, an introduction

This tutorial covers the absolute basics with a fundamental part of your Mac. I recommend that you check this article out as it could be the most important tip of them all! Think of the Finder as your window into OS X (Operating System 10). The Finder is an application which runs constantly. It’s fair to say that the Finder is your desktop image and the files/folders which reside on your desktop. The Finder also handles your trash.

But most importantly the Finder is the Finder window.

  1. Click once on your desktop, this activates the Finder. You will notice that the ‘Finder’ menu is displayed in the top left. Notice in the menu you have Finder Preferences, another clue that this is just another application
  2. Press command-N. This is a shortcut think of N for New.
  3. Now we can see our Finder window.

Familiarise yourself with this Finder window.


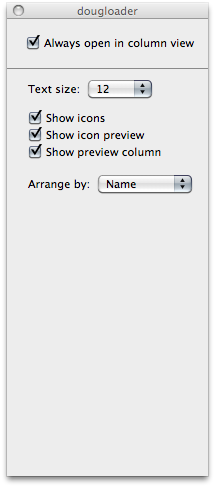
  1. There are 4 different ways that you can navigate the Finder. My personal preference is the column view, I always recommend this to students and teachers as it makes most logical sense to me. Now control-click the Finder window and choose Show View Options. Check always open in column view.
  2. Control-click on the title of your Finder window. This displays the absolute location with your computer.
  3. Always store your personal files within your own Home Folder. If you ever migrate to a new Mac or need to grab all your personal files quickly you’ll be glad you did! Your iTunes music collection and your iPhoto picture collection are kept safely in your Home Folder, as are your emails no matter which client you use.
  4. Notice your Desktop Folder in your Home Folder. Also notice the Applications Folder. Its empty right! That’s ok, your system has another Applications Folder stored right at the top level of your Macintosh HD. That way more than 1 user can share the same applications on the Mac. Sometimes you might want to install an application in your own Home Folder/Applications, that way the Application is private and exclusively yours.


My Finder window is small! Its missing the Sidebar!

  1. If you cannot see the whole Finder window just click the top right grey button. This will reveal or hide the sidebar.
  2. Also control-click the sidebar itself. Open Sidebar preferences. Here you can customise the look and feel of the Finder. Don’t use the ‘Search For’ smart folders? Get rid of them here.


How do I create and colour folders?


  1. To create a folder simply control-click in the location you need the folder to be. Choose new folder. Right click that folder and select a label colour.
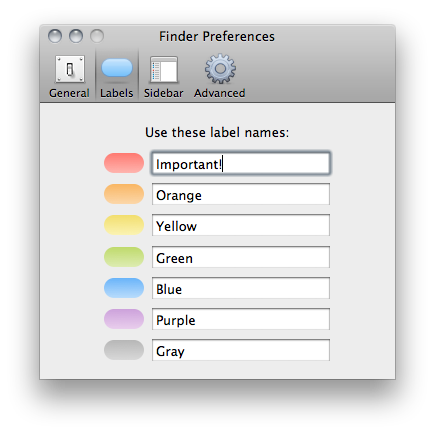
  2. In the Finder Preferences you can also change the name of the folder labels.


Organise files with Smart Folders

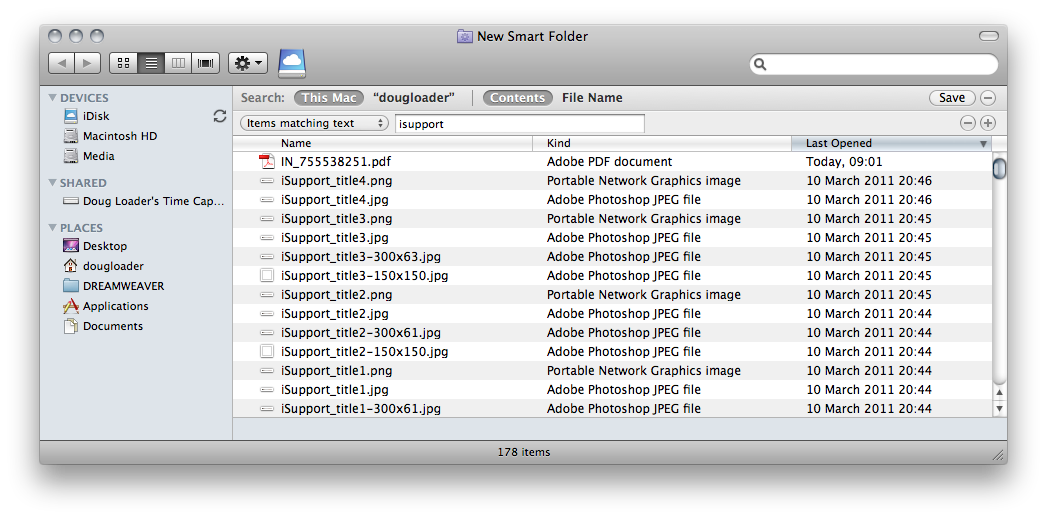
Smart Folders allows you to organise files which have something in common.

  1. Select File>New Smart Folder.
  2. Now type a search criteria in the search field. In my example I’ve typed isupport.
  3. If I save this search and attach it to the sidebar, even new files that I save in any location on my hard drive will be added to this folder. Its worth noting though the files are not duplicated into this folder, you can simply see the original file from this new location.


Launching applications and finding files with Spotlight

Spotlight is an extremely powerful search tool for your Mac. Use it just once to launch an application and you’ll begin to realise how this feature can save you stacks of time.

  1. Press the command and space bar keys. You’ll notice Spotlight is activated in the top right of your screen.
  2. Type the letters ‘ITU’. You’ll see the top hit highlighted in blue is iTunes.
  3. Hit return and iTunes launches.

If you are servicing another persons Mac or need to open a Utility you don’t often use, Spotlight is an extremely quick alternative to scanning through the Application folder. Try it a few times and i’m sure you’ll be hooked!


Quickview

  1. Select a file or folder anywhere on your Mac and press the space bar.

This works with spreadsheets, pdf's, even presentation files. What a time saver!


I hope that you found these simple notes helpful. If you get your head around the Finder early on and organise and structure your file system from early on, it will seriously pay off in the future.