An Apple Dilemma

iPad_Apple_Books.jpg

Macbook or iPad for my school?

This is a fresh debate. And one where the question should perhaps be ‘laptop or tablet device?’. Another question which i’m certain has echoed around many a principals office is ‘should we engage in a personal digital education at all?’

It only seems like yesterday when we were trying our hardest to banish all mobile phones from the school grounds and now we find ourselves equipping kids with even more powerful, ever decreasing in size communication devices.

Tablet computers are an all round seductive device. The package itself is small but heavy, reminiscent of an expensive christmas gift. It is tied in a beautiful silk bow which unravels itself to reveal glossy glass and polished aluminium. The rich and vivid colours of the display ooze quality and class. “This is where education should be! How can we possibly go wrong with each child equipped with one of these things? I mean they can hold every book ever made, right?”

I am going to assume that you are at the stage of ‘We want a 1:1 environment’ and I am also going to focus on the Apple Macbook and iPad. I aim to share with you my first hand experiences so that you might make a decision between OS X or iOS.

OS X or iOS?

Don’t worry I am not about to start discussing the benefits of an ARM processor over an Intel chip. OS refers to the Operating System, the platform if you like which really provides the user experience. OS X is the MacBook operating system and iOS refers to the iPad platform, and it is here where you are truly making your decision.

Recently a principal from a developing school here in Australia approached me asking for my opinion. He said to me;

“We are in a fortunate position where we chose not to jump 2 years ago into a fleet  of Apple notebooks. Now we can wisely invest into providing a 1:1 iPad environment into our school”

Adamant in the fact that by A, not acting 2 years ago was the right thing to do and that B, the iPad was beyond any doubt the right way to proceed surprised me a little. With a completely unknown track record the decision to go with an iPad is often one which has already been made after fore-mentioned disrobing of the alluring device and not after extensive trial or research.

After all OS X had been in development for over 8 years. With the likes of Microsoft Office, industry standard design tools from the Adobe suite and full access to online technologies such as Flash we knew where we stood. This platform offered a truly flexible learning environment, as a teacher we could pick and choose media and content which complemented our syllabus as we chose to teach it. Not restricted by Apps as vetted by Apple staff.

OS X has proven itself to be an outstanding study partner. The Macbook offers sturdy design and a long battery life. Certainly in my experience students take well to the iLife suite. Podcasting, and movie making is a snap for most. It is a platform which I am an ardent fan of, one which prepares the students properly for careers where word processing and spreadsheet manipulation is essential. Learning on a Mac teaches other basic computer skills such as file handling and touch typing. Without these skills we are simply not preparing students properly for a digital future ahead of them.

My discussion with the curious principal continued. We crooned over the features and portability of the iPad, the medium to low price tag and the ‘third dimension’ of its touch screen. Eventually our conversation developed further into the integration of the device into classrooms and into the hands of teachers.

Classroom trials of the iPad have been met with mixed responses. In terms of an ebook reader it certainly shines. Finding the correct ebooks however has been difficult. But this is changing. Teacher attitudes have also began to shift and I think there is a clear focus on content creation from the school itself. Creating PDF documents, and interactive iBooks is now a very simple task. Getting those digital formats onto the iPad is also becoming simpler, sought of.

That Syncing feeling.

The iPad, in anything but a 1:1 consumer situation is very difficult.

For years I didn’t believe that ‘syncing’ was actually a word. That was until I became a proud owner of an iPhone and entered the Apple eco-system. Syncing isn’t a word that normal people use. It is a slang term which now represents the painful mine field of multiple Apple ID’s and mysterious windows asking you if its ok to “Erase and Sync?”.

It is almost the first task which an administrator of 2 or more iPads in a classroom situation will need to do. How difficult can this be? I’m perfectly happy to purchase a school license, can’t I just double click the install file?

For months I researched this topic, trying to find a fix which doesn’t break the 35 page long App Store T&C’s. There are a few convoluted solutions involving distribution of gift cards or iTunes credit, but why is it that Apple make everything so simple but this is so complex? And i’m still not sure how ethical it is that every student must exchange their personal details with Apple for an Apple ID.

There does seem to be a solution coming via ‘App Store Volume Purchasing’ but for the moment we must wait.

Apple have also answered many device management questions and using the right set of tools it is possible to lock down an iPad and restrict access to certain components. (such as the camera or the Safari internet browser). So with the right implementation shared devices in a school may work well.

With the tight control of Apples Apps and personal ID’s it all feels a little overwhelming. Never before on a Windows machine or OS X did it all feel so difficult, however playing by Apple’s rules might have some very positive impacts on education...

Pedagogical Values

A sand-boxed user experience is the first thing that hit me when I used the iPad. This meant that apart from the clock and battery indicator there were no other distractions when I was using an App. There is no cluttered desktop behind floating windows or header icons vying for my attention. So I was focused on the task at hand. This is a highly under rated feature and one which comes into its own in the classroom.

Multi-tasking for a modern student is when they are typing 3 essays at once while researching online, updating Facebook and streaming a video. Now you just cannot do all of these things simultaneously on the iPad. And that is a good thing for teachers trying to maintain a single focus in class.

It is for this reason that the iPad is truly chameleon like. It is a scientific calculator for a science period. It is an atlas for another and a musical keyboard for another. On the way home the iPad becomes a magazine and at night your bedtime book.

The way in which information is provided and accessed is revolutionary on the iPad. ‘Our Choice’ is an application developed with Al Gore as narrator. It is the most encapsulating, interactive digital book available, and the content is incredible. The touch screen is used beautifully to allow the user to engage fully with examples of solar power and wind density throughout America. It uses the built in microphone as another way in which the student can engage with the content. Just in this app alone I think a teacher could guide a student through an entire term of Society and Environment studies.

Gallery is an application which presents over 1100 pictures from the National Gallery in London. The collection of pictures can be sorted by date or artist. With the ability to pinch, zoom and study the pictures it has outstanding value in the art class.

The entire works of Shakespeare downloaded in minutes for free. Bram Stoker, Jane Austen and Oscar Wilde to name just a few are all free via the Ebook reader. Quickly my initial thoughts that this device was better suited for junior school students learning their ABC were proved wrong.

As I evaluate the many geography & history apps I gasp in disappointment that I didn’t have access to such interactive maps and animated detail when I was a student.

Indeed any science teacher would drool at the classroom support provided for learning the periodic table or even studying astronomy through the touch screen which literally brings the skies to life.

Never before has such a repository of information been available to assist teacher and student. The App Store is just starting to take shape. In the years to come one can only imagine the ingenious forms that apps will take as developers and educators continue to out trump each other.

The iPad has been equipped with an exceptionally powerful processor. It is equipped with three-axis gyro sensor as well as an accelerometer, and light sensor. It also has a built in digital compass and 2 cameras. What does this all mean? It means that the hardware is capable of so much more. The software development will never be hindered by lacking hardware. The journey is just beginning, the future a bright beacon of LED-backlit glossy widescreen Multi-Touch display with IPS technology. IPS technology? i’m not sure either but I do have faith that this investment might be the right one.

Conclusion

Undoubtedly the iPad in education is finding its feet. The Macbook will, for the time being continue to be a safe choice, especially in its latest incarnation, the MacBook Air.

My recent findings have concluded that the iPad is a superior form for accessing data and assisting in student consumption/learning. However I have found the creation of original content on the iPad to be not as fast or dynamic when compared to the Macbook. Although I am certain that youth today will take to the screen keyboard and pinch-pull zooming etc very quickly. It is of course possible to use external bluetooth keyboards, but I personally feel that this defeats the point a little.

After extensive experience with year 7 - 12 students and observing the ways that they are using their personal MacBooks, it seems clear to me that the majority of time is spent on internet browsing/research and word processing.

Adobe Photoshop is used extensively. The note taking software Inspiration and media creation tools iMovie and Garageband seem to be the next biggest use of students time, (closely followed by gaming and social networking). Most of these applications are easily substituted with counterparts on the iPad.

The school computer labs were, I thought becoming a thing of the past. But the idea of a lab existing along side an iPad 1:1 environment is a practice which would work well. It is here that you may choose to conduct Photoshop training. You may also choose to have a ‘Pro’ suite set up allowing students to learn film editing or 3D research for example. It is these labs that enable the student to experience conventional desktop computing and also skills such as touch typing.

I would not like to be in the position where I am tearing the MacBook from the hands of tech savvy students to replace them with iPads. But to be able to join my students in what can only be described as a journey of immersive learning where almost limitless resources are just a tap away is an opportunity too good to miss out on.

Apple have consistently listened to and addressed issues raised from the education sector. I am anticipating that the arrival of the App Store Volume Purchasing for education in Australia will be the final part of the jig-saw. Combine this with a carefully planned deployment and iOS 5 arriving this summer and the iPad is looking like a good choice.

iPad 3G or iPad Wi-Fi?

Personal-Hotspot.png

Why you only need one cellular device

With a price difference of $150 it is well worth getting the facts straight before you invest in your new iPad.

A standard iPad is fitted with Wi-Fi capability. Perfect for using the iPad at home (if you have wireless router) or near a wireless hotspot like a cafe or Mcdonalds. You simply jump on the wireless internet connection and the device comes alive with all the rich online media content and apps.

A 3G enabled iPad has the added advantage of being able to connect to cellular signals in the same way that a mobile phone does. This means that you can connect to the internet anytime you have 3G coverage from your network operator (Telstra, Vodafone etc). Well if you travel a lot with the iPad and you need the connectivity to check emails, browse the internet or even make Facetime or Skype phone calls then this is a no brainer. You will need the iPad equipped with Wi-Fi and 3G. Right…? Wrong if you already use an iPhone just enable Personal Hotspot.

It seems that most Australian carriers allow for Internet Tethering or Personal Hotspot activation from your iPhone. So if you already have a generous 500mb quota each month, use it from the iPhone & your iPad!

iPhone 3GS

  1. On your iPhone go to Settings > Personal Hotspot and turn this on
  2. Make sure that your iPhone & iPad bluetooth is turned on. Settings > General > Bluetooth.
  3. Once your devices are paired using Bluetooth you should notice a blue strip at the top of your iPhone Screen. This indicates that 1 device (your iPad) is utilising your shared 3G connection.
iPhone 4
  1. iPhone 4 allows you to connect to the Personal hotspot via conventional Wi-Fi too. For a detailed look at the benefits of a Wi-Fi connection check out this article.


Free Educational Documentaries

Educational_documentaries.jpg

I have compiled a fairly extensive list of sites which allow for the streaming of documentaries. Most of the documentaries can be classed as educational, some content is fairly cutting edge and thought provoking so be warned and choose wisely. We in no way endorse the views expressed in any of these programs! You will find many provocative but also informative documentaries. These sites mainly cater for the American audience with a lot of political views being expressed. However you can also find some real gems like the complete BBC documentary 'Planet Earth'.

Its worth noting that the sites listed below generally do not host the actual video footage. Often they are just embedded links to other video hosts such as YouTube, Google Video 0r Vimeo. This is worth remembering because if you would like to share these videos with your class but not get them distracted with other content, just grab the embed code from the host and place the videos in your own wiki or website. If you need help doing this let us know.

In no particular order take a look at the below documentary sites.

Free Documentary TV - http://www.freedocumentary.tv

Top Documentary Films - http://topdocumentaryfilms.com/watch-online/

Documentary Heaven - http://documentaryheaven.com

Documentary Wire - http://www.documentarywire.com

Watch Free Documentaries - http://watchfreedocumentaries.net

Short Film clips with a heavy focus on education - http://aso.gov.au/education/

Other Resources worth checking out are:

http://www.pbs.org/teachers

PBS LearningMedia is a dynamic platform offering the best of public media content and produced specifically for PreK-16 teachers. With free access to over 14,000 high-quality resources tied to national standards, teachers can download, save and share exactly what they need for an inspired classroom experience.


http://onebigtorrent.org/


If you feel like embracing legal Torrent sharing this is a good place to start. We will cover the basics of bit torrents in a future article.

OneBigTorrent.org is a new place for sharing material that deals with or is relevant to issues of social justice, progressive and radical politics, independent media, ecology. We run a local bittorrent tracker (which we encourage uploaders to use), and we also host torrents from other trackers, as well as ed2K and Magnet links.

There cannot be a formal definition of what content we deem appropriate for upload. If the concepts above don't suit you, browse the index -- you'll get the idea quickly. We typically remove obscure stuff dealing with UFOs, mind-control, secret societies, Black Helicopters and what have you. The net is full of this bs anyway.

We hope that you find these links useful. Don't forget to bookmark this page if you want to refer back later.


Unlisted Youtube

secureYouTube.png

Uploading video to Youtube is nothing new. It's the quickest, and probably most simplest way to share video with the world. It works on pretty much all devices, and is supported across all operating systems. Unfortunately, school rules prohibits you from sending video out to the internet without parental permission. In my last school, I was prohibited from uploading anything to Youtube because of this, as it was seen to be a full 'public' forum with no privacy. What I never quite understood however, was why we were allowed to post student photos out to the intranet or shared drives on the network, with no parental permission at all. This may not be a true form of 'public', however there was still a lot of people with full read/write/copy access to these photos and no way to prevent them sending these on further.

I then discovered Youtube's ability to post videos as 'unlisted', which essentially means it's removed from all search engines. The video becomes accessible via a link only, which can be distributed via email or embedded into a website. This video now takes on the same form as a photo, with it having as much security as text in an email or a photo on a private network. Schools can use the benefits of Youtube, without compromising students privacy and safety.

In short: Posting a video to Youtube in a school IS possible if you enable 'unlisted', thus eliminating it from search engines and making it available only to people who have the link.

More information can be found here

Google in Education

GoogleLogoOnWall1.jpg

Why we can no longer ignore what Google are bringing to the table for educational institutes.

Google are providing a complete solution for schools which has every base covered.

Wireless networking, complete collaboration, power, stability, security and back-up.

Administration

Each computer in your fleet can be managed seamlessly from a single online administrator account. Updates are automatic (you’ll never even know that they are happening) and security is a tight as you need with new ‘tab sandboxing’.

The main concept to get your head around is that pretty much all of your work lives on-line. So if you are word processing, number crunching or even working on a presentation every step is performed inside a browser window. Or Google Chrome to be precise. And don’t underestimate the functionality of the applications available to you. You can video edit, podcast produce & create extremely complex and powerful spreadsheets or presentations.

There are many, many other advantages when it comes to going with Googles' new cloud experience.

Email, (or instant message, even video call!)

Using Gmail... but this doesn’t mean having a @gmail.com email address. Your can still continue to use the schools domain address. Using Gmail email account servers also means every user in your institution can have 7.2GBs of storage and you can send emails up to 20mb in size. Each email inbox can be personalised with the school logo. The mailbox also offers ‘Labs’. These are like tiny email Apps which include common tasks such as ‘Undo Send‘ and immediate language translation from any language to English and vice-versa. The email inbox also contains the ability to send instant messages to your colleagues who are online as well as instant video chat.

The email inbox begins to act a little more like your personal intranet system. You can easily see all of the documents which you are working on, you can share them with individuals, staff groups, or classes. Working in real time on the same document with a colleague is easy - even multiple colleagues.

The Google Calendar

Most people are familiar with the power and flexibility of the Google Calendar. Overlaying multiple calendars into one view is a snap, sharing calendars  and sending notes to calendar owners is also simple. I have also found that the sharing of Google calendars across different platforms (iCal, XML or HTML) is extremely stable, so you can publish straight to your website and have limitless subscribers. Perfect for a school environment!

But the experience is so much richer than just that.

The Google Apps Marketplace

Welcome to the largest collection of apps designed specifically to function inside Google Chrome. These apps can be installed by your administrator and made available to all of the users within your domain. Many apps have the ability to access data from your contact list or calendar accounts. Communication, project management and design apps are extremely popular. The focus with these apps is to strengthen collaboration which I think is the true strength behind Google.

Google’s new Education category on the Apps Marketplace is an online repository filled with learning management system (LMS) software, web-based grade books, and other content that can be shared among an entire school district or college campus with the click of a button.

iSupport’s top 3 favourite Education Apps


1. Thinkwave - A fast and reliable online student information system that is easy-to-use and quick to deploy.

  • Import students from Google Apps.
  • Log in with Google Apps usernames.
  • Collect grades and attendance online.
  • Generate report cards and transcripts.
  • Upload handouts online. Collect homework from students online.
  • Integrated gradebooks for teachers.
  • Grades online for students and parents.

2. Stupeflix Studio: Easy video creation

  • select a video template .
  • fill the template with pictures, video clips, soundtracks.
  • rearrange, fine-tune, preview.
  • export your video on YouTube, Facebook, or download the file.

3. Aviary Design Suite for Education

Free design tools and templates to create, modify and share images, presentations, audio tracks, podcasts & more. Classrooms can collaborate on multimedia projects. Works directly in Google Docs.

  • Create Logos, Presentation Slides, Yearbook Pages
  • Retouch photos, Make Web Templates & Icons
  • Develop Podcasts, Remix Audio & More

The Chromebook

Pick up a Chromebook, any Chromebook and you can pick up from where you left off. This flexibility is a huge advantage for students and administrators in a school or college. Your valuable data is never lost and you really don’t even have to think about it.

And if you opt for a 3G model Chromebook, you don’t even need to instal a wireless network into your building... But this begs the question, are Google just a little bit ahead of the game? With 3G networks and even broadband networks, Australia certainly has a long way to go. This device relies heavily upon an always on connection, at home and at school.

So what about pricing? Well the in the U.S. you are looking at around $20 per unit per month. Minimum 3 year contract.

For more updates on the impact of Google in our Australian market, watch this space.

Google Apps for education - link - http://www.google.com/apps/intl/en/edu/


Keyboard shortcuts for OS X

osx_keyboard_shortcut.jpg

Learn these basic shortcuts to increase your productivity

We have published this set of useful keyboard shortcuts on our 'Apple in the Classroom' section so you can download them and print them off. Although this is not a fully comprehensive list of the OS X shortcuts we feel that Teachers especially would be able to benefit, mainly because they will save you time, lots of time!

So please refer to the list and if you feel that we have missed anything important let us know in the comments section.

⌘ command key - Your are commanding your computer to perform an action.

⌥ option key - You will be presented with options/alternatives.

⌃ control key - A modifier key. Can be used in combination with the above keys.

⇧ shift key - Rarely for shortcut modification, but those that do are worth remembering.


View/Change Application

  • Keep the command key held down while pressing tab.

This allows you to view all of your open applications. You can bring one application to the top of your layer (making it the active application).

Find a file or application quickly

  • command + spacebar.

You will notice the spotlight search open in the top right of your screen. Now type ‘itu’ and hit return. You just launched the iTunes application. Also a great way to find files, email etc.

Finished with an application? Close it!

  • command + Q - Think, I am ‘commanding the computer to Quit’.

Other important commands are:

  • command + S - Save.
  • command + N - New (new email, new document, new Finder window, depending which application you have active).
  • command + P - Print.
  • command + A - Select all (text, images, files etc)
  • command + C - Copy.
  • command + X - Cut selected text to primary clipboard.
  • command + V - Paste clipboard contents.
  • command + Z - Undo.
  • command + H - Hide active application.

Finder specific:

  • command + delete - Delete selected file/folder.
  • command + i - Information, such as file size about selected file/folder.
  • command + option + i - using the option key here is a variation of the above command. Now the information window dynamically changes to reflect the currently selected file.

Screenshots:

  • Command + Shift + 3 - Takes a fullscreen screenshot and saves it to your Desktop
  • Command + Shift + 4 - Takes a screenshot of a screen area and saves it to your Desktop
  • Command + Shift + 4 + Space bar + click on window - Takes a screenshot of a certain window.

My personal favourites:

  • command + control + D - Mouse over any word and this key combination will reveal the dictionary definition and thesaurus option.
  • command + T - New tab in a internet browser window.
  • command + K - Cuts to secondary clipboard.
  • command + Y - Pastes secondary clipboard contents.
  • spacebar - Press when any file in selected to preview that picture, document, even movies.
  • option + shift + command + V - Seriously, try this one once and you’ll never stop using it. It will paste text into a document and copy the Paragraph Styles of the document. This one will save you the most time.
  • When viewing menus, such as the  menu hold down the option key - notice that About This Mac changes to System Profiler. This expansion of menu options is common with the option key.

This list may seem like a lot to remember but I can’t recommend enough that you try a few of these. Print out this document, keep it near by and I guarantee that you will save minutes everyday. Those minutes add up and you will be far more productive.

If you have any of your own favorites that are not on this list please contact us at iSupport and we’ll happily add them.


Excluding files from Time Machine backup

Time-Machine.png

Time Machine has to be one of the most useful tools on the Mac. It's one of those options you hope you never have to use, but when you do need it, it becomes invaluable. Under the Time Machine preferences, you do have the option to exclude files & folders. I use this feature when I am storing large files (usually videos), knowing that I either have a backup somewhere else, or only want them on my machine for a short period of time. This helps if you only have a small Time Machine drive, or know you will never need those files/folders again.

To enable this feature, open your Time Machine preferences:


Then click on Options:

And finally add any files or folders you wish to exclude:

Click Save and you are done. Time Machine will now exclude these files & folders from your backups. Your welcome!


What makes a great school website

SchoolWebsite.png

Things to consider when building the perfect school, college or university website.

When I was recently asked to 'up-date' my school website I went through many stages of research, design & development. I thought it would be valuable to share my ideas and findings with you, just incase you find yourself wanting to overhaul your school or college's online presence.

Firstly I spoke with many of my colleagues & I asked them how often they used our existing website & for what purpose. The response regarding the original website was fairly negative. Not one member of staff had visited the website since their initial enrollment into the school. Next I spoke with some parents, most of whom responded with complaints of 'too much information" and a "badly organised space". However the most common complaint was that the website was quickly outdated and it all seemed rather static.


The challenges.

I knew that I had to design a site that could be;

  1. extremely easy for anybody to update but also one that looked great.
  2. It needed to house a lot of information but at the same time be easily navigated.
  3. I also wanted the website to be used by both staff, students and parents alike.
  4. I wanted it to become a type of forum where parents could easily be notified of upcoming events and news but also one where job applicants could post their resumes.
  5. I wanted current staff to visit the site and easily access the intranet.
  6. It had to be full of multimedia & showcase students work in picture & video.

To cater for all of these groups that make up your school community can seem like an overwhelming task, but it can be done. And you can do it all by yourself for next to nothing.

Wordpress

Wordpress is a platform normally associated with blogging. It's popularity has grown hugely in recent years and the development of the software has come a long way. I chose to use Wordpress because I new that my final website was going to have to be built on blogs, or news feeds. These news feeds could be written & published by a variety of people and a large variety of people will subscribe to those feeds. This would ensure that the site was always up to date, and could also hold a lot of organised information.

By breaking my community into 4 different categories titled Junior, Middle and Senior School and also a Community feed, I could make the information easy to be consumed. Each article published would not only be assigned a category but also time stamped allowing for further search terms to be applied.

Wordpress not only allows for articles to be published on ever growing feed pages, it also allows for static pages to be created. These static pages would make up the About Us & Contact style pages. I would also develop a simple Careers page which would house a list of available jobs and embedded forms so that one could apply online for that job.


The Design

A Wordpress site uses CSS for almost every design element on the page. Cascading Style Sheets is an amazing coding language where you can specify everything from your Paragraph Styles to the Padding used around pictures. You do not need to know any CSS to get started with your site but to truly personalise the look and feel it will help to root around in the style.CSS sheet at some stage.


Hosting

The website will need to reside somewhere. In my case the school preferred the website to be hosted internally, on our own servers. The alternative is to host the website with a private hosting company such as 1&1 or Go Daddy. Unpacking your Wordpress files and establishing a MySQL database to store all of your articles and pictures is only a Google search away. Google analytics and Feedburner are two services which I recommend. Feedburner allows you to monitor how many people are subscribed to a particular Feed in your website, and Google Analytics provide a detailed overview of your sites traffic.


The Developers Role

My role as developer of the site had to end just there. In a short time frame of just 4-6 weeks I had to have the site ready to go but also have 2 members of my admin team fully trained to update and maintain all of the articles video and picture content when required. It is here where the true ease of use and flexibility of Wordpress came into it's own.

To see the website click here.

  • If you require any assistance or general support for the online presence and marketing of your school website please contact iSupport.


Dropbox for the classroom

Dropbox.jpg

Experience across a large number of schools has taught me that no two schools or classrooms are the same. One of the issues related to bringing technology into the classroom is making sure it works! There is nothing worse than preparing a lesson based solely around technology for it to fail right at the critical point in the lesson. The reason why I love technologies such as Apple and Google so much is that they work 99% of the time, which is crucial when using technology effectively in any lesson. Dropbox is one of those technologies that works when you need it, and is so widely supported on many different platforms it will have your school administrators shouting with joy when they see how effective and efficient your classroom is running.

So what does it do? For the teacher, it allows you to share a folder on your device (Windows, Mac, iOS, Android, Linux & BlackBerry) with your students device - completely free! You get 2GB of storage (more if you invite people) to start with, which is more than enough to get your going. As long as you have your students email accounts, you can share a folder with them - its that easy. Any file you place into this folder will automatically show up on the students device. Alternatively, any file a student places into the folder will show up on your device.

It's totally up to you as to how you organise the folder. You also need to remember that anything you put in there can be deleted by students. All files are backed up on the www.dropbox.com website, so you can always go back and restore whats missing (and to also find out who deleted your file!).

The best part about this is that you don't need to rely on anything other than an internet connection. It will work both at school and at home, so you can send and receive files at any time of the day without even being in front of the students! It has to be one of the most effective ways of sending and receiving files without any help from your IT administrators or computer science degree.
A great video that explains how it all works can be found at: What is Dropbox?

To sign up for an account, simply visit www.dropbox.com

The iOS app can be found here


Syncing multiple devices, sharing iTunes content

sharecontent.jpg

I want to share/control the apps on the devices in my class? How many iPads can I sync to iTunes? You can sync as many as you like... You can literally sync 100's of iPads to one iTunes library. There in turn allowing an entire class of students access to your collection of Apps. However be aware of Apple's T&C's in the App Store.

You can also authorise up to 5 accounts on one iTunes library. So I can authorise 5 separate iTunes accounts all to play on my copy of itunes. If the content plays on my copy of iTunes - I can synchronise it to my iPad/iPhone.

If I can sync limitless iPads I can ensure that all of my students have all of the correct apps, films and podcasts on the device, when they are borrowing my device.

The above statement is true, and a solution initially trialled by some educational institutes. However please note the App Store T&C's which address this.

"(ii) If you are a commercial enterprise or educational institution, you may download and sync an App Store Product for use by either (a) a single individual on one or more iOS Devices used by that individual that you own or control or (b) multiple individuals, on a single shared iOS Device you own or control. For example, a single employee may use an App Store Product on both the employee's iPhone and iPad, or multiple students may serially use an App Store Product on a single iPad located at a resource center or library. For the sake of clarity, each iOS Device used serially by multiple users requires a separate license."- http://www.apple.com/legal/itunes/au/terms.html

Thank you reader Deon for bringing this to our attention.

At present it appears that some schools may purchase an app one time and distribute it to all their iPod touches, iPads, and iPhones. This makes purchases inexpensive and distribution easy for schools, but was not properly compensating App Developers for their time. This issue has been addressed in the USA with a "App Store Volume Purchase Program"  - http://www.apple.com/itunes/education/faq/

Here in Australia 2 methods have been discussed:

  1. Purchase Apps via credit card and distributing those apps to students as gifts.
  2. Purchasing iTunes vouchers pre-loaded with credit and trusting the students to purchase the correct apps as instructed.

The subject area can be confusing. The App Store Volume Purchase Program seems to be the way to go, but here in Australia we need to wait a little longer.


Apple support for teachers

Apple_in_the_classroom.png

At iSupport we have made it easy for teachers who find themselves in an Apple 1:1 environment. If you require a basic introduction to the Apple iLife or iWork suite then head over to our new Apple in the Classroom page. We have created a selection of PDF documents which you can download and use in class. New and old teachers will find our free resources very useful.

Please visit: http://isupport.com.au/apple-in-the-classroom/

We have been contacted by a few people and some requests have been put in for a demo of 'Green Screen in iMovie' and also using a 'wiki or  blog in the classroom'. We will have these documents prepared in the coming weeks - we promise! But please keep the request & comments coming in.

Also we are preparing video guides on the use of the iPad in a learning environment - due out this week. We look forward to seeing you on the site soon!

MacDefender - info and removal

MAC-Defender.png

A program called MacDefender, MacProtector and MacSecurity has been mysteriously finding its way onto many Mac computers. The program cons the user into a paid protection subscription which does nothing.  How has this been happening? A rather malicious file called "mac-antivirus.zip" has been spreading via fairly legitimate advertising networks, including google. A download is initiated automatically via javascript to the users Downloads folder. If your Mac is set up to open downloaded files automatically... then the trouble starts.

What can you do to avoid this?

Safari's default option is to automatically 'Open "Safe" files after downloading'. This is not a good idea, it seems that OS X has troubles distinguishing safe from un-safe files.


Disable 'Open "Safe" files after downloading'.


  1. Open Safari.
  2. In the top left of the screen click the Safari menu, then Preferences.
  3. Click the General tab.
  4. Uncheck the "Open 'safe' files after downloading" option.

How do I remove MacDefender, MacProtector or MacSecurity?

  1. Open Activity Monitor located in your Applications/Utilities folder - Alternatively type "Activity Monitor" into Spotlight and hit return.
  2. Locate MacDefender, MacProtector, or MacSecurity in the Process Name column.
  3. Highlight the title then choose Quit Process from the menu bar.
  4. Next go to System Preferences/Accounts. Select your account from the left-hand column.
  5. With Login Items highlighted select the program from the list then press the '-' (minus) button.
  6. Finally check your Applications folder and drag the program into the trash can. Empty your trash can.

The excellent ClamXav virus scanner continuously updates its definitions to detect and remove these types of "scareware" programs. For more information click here.

Generally it is considered good practice to never 'click through' from unknown pop up windows that appear on your screen. And you should never make payments to an organisation unless you have instigated the transaction or it is a reputable company.

New Mac or new image? 10 things to consider doing.

Mac_Box.png

This article is perfect if you have just bought a Mac & you're unsure what to do with your new machine. Network administrators who have to create an 'image' for their company or school will also find this interesting. When you create an image which will be duplicated across 100's of machines in your organisation you need to be sure that you provide a flexible set-up that caters for every possible outcome. All of these points below should be considered when creating a clean start or image.

  1. Run System update from the Apple menu.

  2. Always set the clock so that the dividers : between the numbers flash.

    This quick trick is an easy way to see if the system has encountered an irrecoverable crash. If you're having issues & those dividers are not flashing you will have to hold down the start button until the machine shuts down. You may also wish to display the date.

  3. Remove around 3 gigs of unneeded language files fom your system.

    Monolingual is a great 3rd party tool to do this for if you are not confident doing it manually. I highly recommend monolingual, it is a free download so please check it out.

  4. Screen real estate is vital.

    Ensure that 'automatically hide and show the dock' is selected in the Dock preferences. Keeping the dock out of sight will allow 13" macbook screens to use their full 800 pixel depth all the time.

  5. Enable right click for the mouse.

    There is nothing more annoying then plugging in a mouse only to find that the 'right click' doesn't work.  It is listed as secondary click in the Mouse Preferences.

  6. Do not enable either Spaces or Expose.

    This will only lead to confusion for the user, especially if they are a beginner. Once the user becomes familiar with 'active screen corners' and why expose or Spaces will be beneficial for them allow them to enable these features.

  7. Disable Automatic Login.

    You will find this in the Accounts/Login Options, this is vital for security.

  8. Network Locations!

    Assuming that your organisation runs behind certain proxies you will need to enter those network settings to allow access. Or indeed for home users you may find yourself regularly visiting a location where you are always entering an 802.1x authentication which just don't need when accessing you home network. Create 2 different locations in the network settings menu. You can quickly swap the location from the Apple menu.

  9. Install Firefox.

    Between Fifox & Safari you should be able to render any part of the Internet correctly. Surprisingly the are many tasks which only Fifefox can perform properly online. You'll know when you'll need it.

  10. Downlaod & install Flip for Mac.

    This will allow you to run most .wma & .wmv (normally reserved for Microsoft platforms) files.  You may also want to consider installing VLC player. This way any video formats that QuickTime cannot play should be covered by VLC.

  11. Set your system Language to British or Austaralian English if needed! Check this tutorial for more on the that
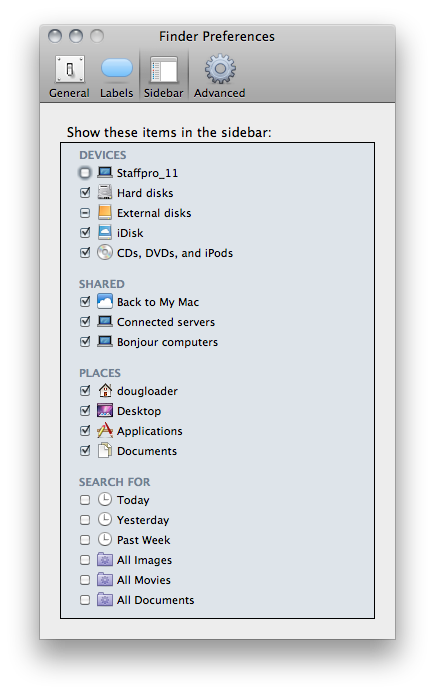
  12. Click on the Finder menu & choose Preferences.

    Click the Sidebar menu. If you are just not going to be using the Mobile Me service uncheck the iDisk device.You may wish to further customise the Finder window from here.  For more on the Finder check out this article.

  13. Ensure that PDF documents are opening with Adobe Acrobat Pro (if you have it installed)

    Select a PDF document and press command I. In the information window that opens see that 'Open with' has Adobe Acrobat Pro selected. Then click 'Change all'.

Ok so I listed 13 things not 10! But please do have a look into each one of these points after you purchase a new Mac. And definitely consider all of them before rolling out a new disk image for your organisation. Have I missed anything? Please add your tips below...

The Apple Distinguished Educators Institute 2011

ADE-2011.png

A summery of the ADE Institute 2011 ANZ


The weekend brought together so many different people involved in education in Australia & New Zealand.There were teachers from all walks of life, IT engineers, principals, department officials even a Museum curator. But we also spent our time with an International Camera man, a political correspondent and an Indigenous Knowledge expert to name just a few.

The 4 days were littered with outstanding workshops. Australia's Disability Discrimination Commissioner Graeme Innes, addressed many issues but most notably the Universal Access options inside OS X. Combine these tools with keyboard shortcuts & folks of zero/low visibility can operate almost all aspects of OS X. This was reinforced by a chap called David Woodbridge who works with Apple evaluating their technology for use by low vision and blind user.

Listening to Pieter De Vries, an internationally recognised cinematographer was amazing. Being able to talk with him for 2 days afterwards was even better. His knowledge and experience were an incredible resource to ta

A very beneficial 45 minutes were spent honing our presentation skills with an expert in public speaking. The same afternoon also saw us creating epub documents and discussing the various ways they can be consumed and what their impact on education may have. Also Keynote, Garageband and Final Cut pro workshops featured heavily. Always headed up by knowledgeable Apple staff who not only lectured and showcased, but also participated in other activities throughout the weekend. This of-course included meal and drinking times, these time slots were where the real ideas were shared and debated.

My personal favourite part was talking “top secret stuff” with 3 Apple software developers, one of whom had worked on the iOS operating system. All the Apple employers were incredibly generous with their time. One in particular allowed me to quiz him for over an hour on the behaviour of Android, iOS and Windows Phone 7. If there was ever a time to get an insight into the thought that goes into the creation of a new platform this was it. Thank you Marcus for your tips and extending your knowledge and even contact details to me incase I had ‘any other questions or interesting thought.

All of these incredible talks & workshops, intertwined with fellow educators, most of whom became great friends, made for a remarkable weekend. Although I never really looked at this whole process as being a form of ‘Professional Development’ (and those 2 words were never included in any of the documentation) I must say I do feel some what developed.

What now?

Leading the change - there is no doubt that the next 6 - 12 months will see a device revolution in the classroom. Whether that be a Google platform an Apple platform or an HP platform. It doesn’t really matter which technology is used but we must first win over the support of our colleagues because it is in their hands in the classroom. If we can’t deliver the correct vision a long time before we deliver the actual product then the transition will be slow & counter productive.


Remove backgrounds easily with a hidden gem inside Keynote

ParisHilton2.png

Often I will be sent a photograph or graphic and I need a quick solution for removing the background. My first choice would be to import the image into Photoshop. As ever with Photoshop there are a few different methods you can use to cut out the focus of the picture, but sometimes the task can be tedious and if you are not familiar with Photoshop the task can be very time consuming.

Using the Alpha Tool in Keynote, removing backgrounds can take seconds.


Keynotes Alpha tool.

  • Launch Keynote and select the black - blank template.
  • Command-a to select all of the objects on the page then delete.
  • Drag the image from your Finder onto the blank slide.
  • In my example I have a picture of Paris Hilton, this image will work perfectly due to the simple background.

  • With the picture enabled click once on the Alpha tool.
  • Move your cursor onto the blue background, click once, hold the click and expand your selection.

  • You’ll notice as you increase the diameter of the circle the blue that features in the picture is made transparent. As you drag, the selection grows to include the neighbouring area that uses similar colours.
  • So now that you have added a transparent background how can you get the picture out of Keynote and into Photoshop? Just select the picture once and press command-C.
  • Command C copies the picture including the transparent area. Now you can flick over to Photoshop create a new layer and press command-V.

  • Try removing more than just the background and some of the effects can be very inspiring.

Hopefully you are already thinking of ways to utilise this method, for quick mock ups or short deadlines this technique has saved the day many times for me.


Word Processing basics

These notes are for young students are those who are new to word processing. Please feel free to copy these notes but please include a credit. The basics

Most students will have to teach themselves the basics of word processing, most develop some very bad habits which will permanently hinder them throughout their careers.  I would like to see more students adopting some very basic terminology and practices from an early age.  This short tutorial will look at page formatting, layout and design as well as printing and file handling.

Steps to produce a document

  • Specify the page size and orientation.  Go to File - Page Setup.  Default is A4 portrait.
  • Create
  • Save through out in a memorable place in your Home folder
  • Edit
  • Format
  • Print
  • Save (often!!)

As the content of the document is of overall importance I often encourage people to not focus on any formatting until the majority of text has been entered.  Aside from using the enter key to create new paragraphs, the student should focus on correct grammar and punctuation at this stage.


After a document is written and edited you may wish to experiment with fonts.  A document at this level should not consist of more than 2 fonts.  However the student may want to incorporate the use of italics and bold typeface to quote or highlight certain text.


A document will generally have 3 text elements which you may use different fonts and/or weight (bold):

  1. The Body text.  Your paragraphs will be full of Body text.
  2. The Heading text.  Used to highlight text or add new sub headings.
  3. The Title text.  Used for new sections and titles.

Lists should also be mentioned here, offering the use of bullets or numbered lists.  As used below for a list of some basic terminology (after an invisible page break has been inserted here).

Basic terminology

  • Cursor - symbol for where text will appear
  • Edit - make changes
  • Cut - remove selection from document and store temporarily on the Clipboard, which is a section of computer memory.  Generally you can only store one thing at a time
  • Copy - duplicate selection onto Clipboard
  • Paste - place contents of the Clipboard at cursor location
  • Undo - reverses whatever change you just made
  • Insert - add text at location without overwriting existing text
  • Delete - remove text (not saved anywhere)
  • Search - look for specific word(s) or character(s)
  • Replace - can replace specific word(s) or character(s) with stated text
  • Template - a document that serves as a pattern for a new document
  • Thesaurus - looks for synonyms for selected word
  • Spelling check - looks for spelling errors
  • Grammar check - looks for grammar/style errors (of limited help)


Printing

A decision should be early on if  you need your document printed on paper size any different to A4.  Your word processor will not automatically convert your document to a new page size if you change your mind later on.  Select File - Page setup to adjust paper size and orientation.

Saving

As soon as you start you first sentence please select File - Save.  The first time you do this you will be presented with the ‘save as’ dialogue box.  Please choose a relevant place inside your Home folder to keep the document.  Use cmd-S every time you take a pause to save the document as the Apple Mac does not do this for you!

Headers and footers

Headers and footers are repeated across each page in your document.  You can Insert date, page numbers, the file name or a personal message into your headers and footers.

Margins and columns

By default your margins are set to 2cms.  Please have a look in the Inspector Window.  The first category is the Document Inspector.

Please familiarise yourself with the properties on this page and see how the page has been laid out for you.  Agin this is all standard layout for word processors.

Spell check tips

When a word is misspelt it will be underlined in a red line.  If you right-click the word spelling suggestions will be revealed.

  • Another great tip is to hover your mouse pointer over a word, and press ctl-cmd-d.  Keep the ctl and cmd key held down.  Move the mouse over other words and you will have a constant window open showing you a dictionary definition and thesaurus entry.

The correct use of text boxes

Generally I would recommend against using text boxes.  Text boxes are quick solution to placing text and pictures onto the page exactly where you need them.  However it is better to master the use of using the return key and a combination of line spacing and paragraph spacing first.  Text boxes are objects on your page which can be customised with colour backgrounds and picture backgrounds, as well as line strokes and picture frames.

Inserting pictures and wraps

The best method to inserting pictures is to position the cursor where you would like the file (or picture) to be.  Then select Insert - Choose from the top menu.  Select the picture from your home folder (or where ever it may be) and the picture will be placed in position on the page.  The picture is placed ‘Inline‘ meaning it behave just like any other letter in your document.  You can adjust the size of the picture by pulling the small square handles at the pictures edge.  Once the picture is the correct size please experiment with the way the text wraps around the picture.


The Finder, an introduction

This tutorial covers the absolute basics with a fundamental part of your Mac. I recommend that you check this article out as it could be the most important tip of them all! Think of the Finder as your window into OS X (Operating System 10). The Finder is an application which runs constantly. It’s fair to say that the Finder is your desktop image and the files/folders which reside on your desktop. The Finder also handles your trash.

But most importantly the Finder is the Finder window.

  1. Click once on your desktop, this activates the Finder. You will notice that the ‘Finder’ menu is displayed in the top left. Notice in the menu you have Finder Preferences, another clue that this is just another application
  2. Press command-N. This is a shortcut think of N for New.
  3. Now we can see our Finder window.

Familiarise yourself with this Finder window.


  1. There are 4 different ways that you can navigate the Finder. My personal preference is the column view, I always recommend this to students and teachers as it makes most logical sense to me. Now control-click the Finder window and choose Show View Options. Check always open in column view.
  2. Control-click on the title of your Finder window. This displays the absolute location with your computer.
  3. Always store your personal files within your own Home Folder. If you ever migrate to a new Mac or need to grab all your personal files quickly you’ll be glad you did! Your iTunes music collection and your iPhoto picture collection are kept safely in your Home Folder, as are your emails no matter which client you use.
  4. Notice your Desktop Folder in your Home Folder. Also notice the Applications Folder. Its empty right! That’s ok, your system has another Applications Folder stored right at the top level of your Macintosh HD. That way more than 1 user can share the same applications on the Mac. Sometimes you might want to install an application in your own Home Folder/Applications, that way the Application is private and exclusively yours.


My Finder window is small! Its missing the Sidebar!

  1. If you cannot see the whole Finder window just click the top right grey button. This will reveal or hide the sidebar.
  2. Also control-click the sidebar itself. Open Sidebar preferences. Here you can customise the look and feel of the Finder. Don’t use the ‘Search For’ smart folders? Get rid of them here.


How do I create and colour folders?


  1. To create a folder simply control-click in the location you need the folder to be. Choose new folder. Right click that folder and select a label colour.
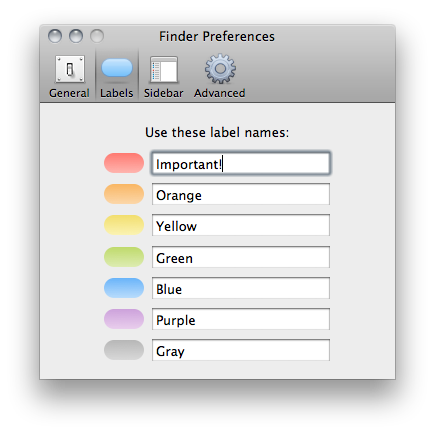
  2. In the Finder Preferences you can also change the name of the folder labels.


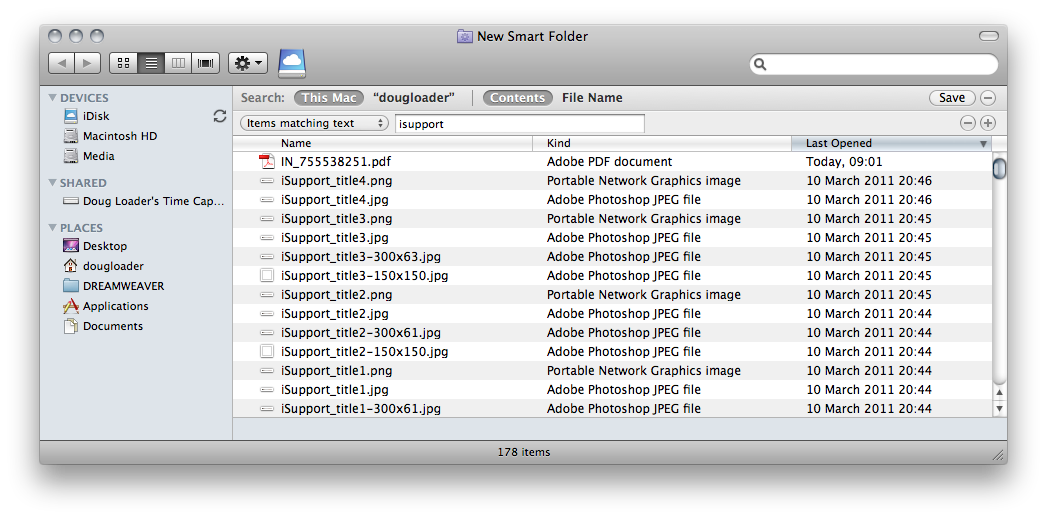
Organise files with Smart Folders

Smart Folders allows you to organise files which have something in common.

  1. Select File>New Smart Folder.
  2. Now type a search criteria in the search field. In my example I’ve typed isupport.
  3. If I save this search and attach it to the sidebar, even new files that I save in any location on my hard drive will be added to this folder. Its worth noting though the files are not duplicated into this folder, you can simply see the original file from this new location.


Launching applications and finding files with Spotlight

Spotlight is an extremely powerful search tool for your Mac. Use it just once to launch an application and you’ll begin to realise how this feature can save you stacks of time.

  1. Press the command and space bar keys. You’ll notice Spotlight is activated in the top right of your screen.
  2. Type the letters ‘ITU’. You’ll see the top hit highlighted in blue is iTunes.
  3. Hit return and iTunes launches.

If you are servicing another persons Mac or need to open a Utility you don’t often use, Spotlight is an extremely quick alternative to scanning through the Application folder. Try it a few times and i’m sure you’ll be hooked!


Quickview

  1. Select a file or folder anywhere on your Mac and press the space bar.

This works with spreadsheets, pdf's, even presentation files. What a time saver!


I hope that you found these simple notes helpful. If you get your head around the Finder early on and organise and structure your file system from early on, it will seriously pay off in the future.


Setting your OS X System Language correctly

Do you ever find your Mac wrongly trying to correct your spelling?  A common example of this would be words such as 'organisation' wanting to be spelt with a 'z'.  Or of course colour, analyse, and fibre all having American variants.  This can be very distracting when creating beautiful page layouts when all you can see is squiggly red lines underlining everything. This is a problem for any English speaking country that is not America.  And it is no surprise that your Mac has been set up with "American English" as a standard (We'll later find that American English is listed as just English).  Which perhaps should not be the case seeming as Canadian and Australian English largely follow British usage.

Well here is how you can set your system language to suit your country of residence so that you can always get it right.

  1. Your first step is to head to your System Preferences (Applications > System Preferences).
  2. Click on 'Language & Text' where we can specify exactly the variation of English we require.

    Language and Text preferences OS X

  3. Drag Languages into order you prefer?  Well English is already at the top, this is in fact American English.  You'll need to locate British, Canadian or Australian English yourself.
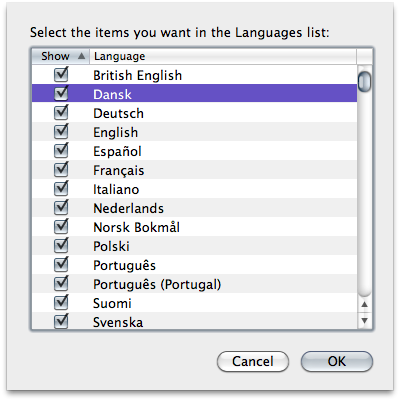
  4. Click on Edit List... and here you will find many different languages hidden away.  Scroll through the list and check the box next to the language you need.
  5. Lastly make sure that you drag your preferred language to the top of the list.  If an application supports the first language in the list, its menus and dialogs will appear in that language. If it doesn’t support the first language, it will use the second language in the list, and so forth.

Once you log back in changes take effect.

Do I need anti-virus protection for my Mac?

Personally speaking I have never run any form of anti-virus protection on my Mac for home use. But then I never run 'dubious' software (such as bit torrent clients or cracked software) on my machine.Also I consider myself to wise to the ways of 'phishing'. If you keep your software up to date and back up your important data I see no reason for an average sensible home user to run anti-virus protection. Often you will find that these virus protection programs can be 'system hogs' and they will capitalise on a lot of your systems valuable CPU. However, if you are a business user or your Mac may be an attractive target for hacking or phishing then I would recommend that you err on the side of caution.

Any free anti-virus tools I can use?

The most popular free tool appears to be ClamXav. If you are running a large network for business I would recommend something more comprehensive from either Mcafee or Norton.